Ever looked in the mirror after applying false lashes and thought, “This isn't quite what I had in mind”? Maybe the strip is hanging off, or there's glue stuck to your lid. It happens.
False lashes can instantly enhance your eyes, but only when applied right. Otherwise, they can feel uncomfortable, look uneven, or fall off. This guide breaks down how to apply falsies without the mess, ensuring they sit right, blend in naturally, and stay in place all day. You don't need pro skills—just a little patience and the correct method.
Before anything else, it's essential to select lashes that suit your eye shape and desired look. Not every lash style works for every face. Some are too dramatic for everyday wear, while others may not provide the volume or length you're aiming for.
If your eyes are small, go for lighter, more natural lashes. For round eyes, choose lashes that are longer at the outer corners to create a lifted effect. Those with hooded eyes may find that curled lashes help open up the eye more.
Individual lashes provide the most natural finish and flexibility, but they can take longer to apply. Strip lashes are quicker and more common for beginners. Choose a band that is thin and flexible. Thick bands can be harder to shape and apply smoothly.
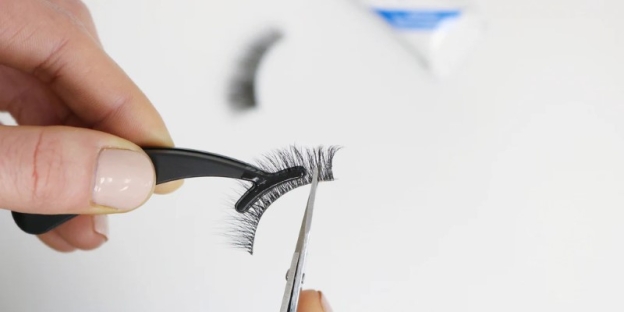
Most lash strips are slightly too long when taken straight out of the box. If you try to apply them as-is, the ends may poke or lift. That's one of the main reasons why falsies end up looking messy.
Hold the strip up to your eye (without glue) to measure how much needs to be trimmed. Always trim from the outer edge, not the inner corner. Use a small pair of scissors and snip carefully, one piece at a time. If you're using mink or faux mink lashes, avoid cutting through the thick clusters; instead, trim along the natural lash pattern to maintain a balanced look.
A well-fitted lash strip should start just a few millimeters from the inner corner of your eye and end where your natural lashes end.
One trick many people skip is softening the lash band. Straight out of the package, the band might be stiff and inflexible. This makes it harder to follow the natural curve of your eyelid.
Gently roll the lash band around your finger or a makeup brush for a few seconds to set the shape. You can even bend it into a semicircle and hold it like that for a bit. This helps the lashes mold better to your eye shape, making application smoother and more secure.
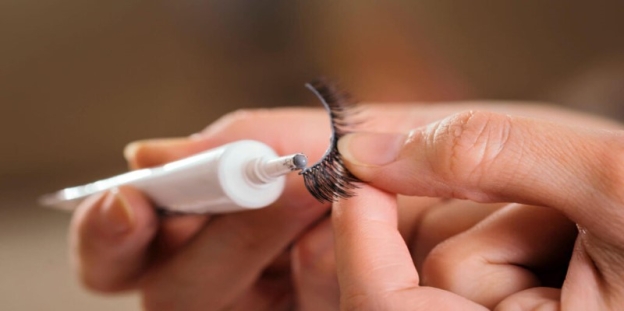
This is where things often go wrong. Using too much glue or not waiting long enough before placing the lash on your lid is a fast track to a messy result.
Squeeze out a small amount of lash glue on the back of your hand or a clean surface. Use a thin brush or the tip of the glue tube to spread a light, even layer along the lash band. Apply extra glue to both ends, as they tend to lift more easily.
Wait around 30 seconds before placing the lash on your lid. The glue should become tacky—slightly sticky but not wet. This step is key. If the glue is still too wet, the lash will slide around and refuse to stay put.
Instead of looking straight into a mirror, hold one below your chin so you can look down as you apply the lash. This angle provides a clearer view of your lash line, allowing you to position the band as close to your natural lashes as possible.
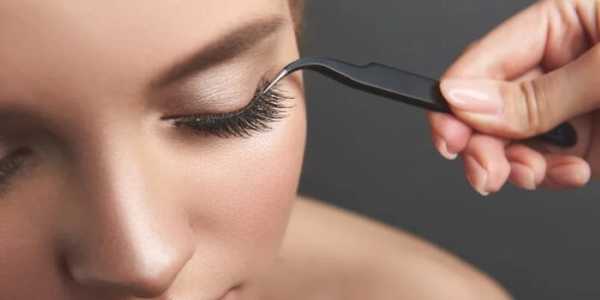
Using tweezers or a lash applicator tool, hold the lashes in the middle. Press the center of the lash onto the middle of your lash line first. Then press down the outer and inner corners. Use the back of the tweezers or your fingers to press the entire band into place gently.
Take your time adjusting it before the glue fully sets. Make sure the lash is sitting right along the lash line, not on top of your natural lashes or your eyelid.
Once your lashes are on, they may still look slightly separate from your real lashes. To make them blend better, use an eyelash curler to squeeze them together gently. You can also apply a light coat of mascara, especially at the roots. This helps merge the two lash lines and gives a more cohesive finish.
Avoid heavy mascara, especially on wispy or delicate lashes, as it can clump and reduce the fluttery effect.
For a more natural look, opt for a clean spoolie brush instead of mascara. Run it through your lashes to lift and align them.
Once the lashes are in place, use a liquid or gel eyeliner to touch up the lash line. Fill in any visible gaps and smooth out the transition between the lash band and your lid.
If you're wearing black lashes, use black liner. For a more natural look or brown lashes, brown eyeliner may be a better option. Winged liner can also help disguise any imperfections at the edges.
This step pulls the entire look together and conceals any remaining glue that may still be visible.
Applying false lashes doesn't need to be frustrating or messy. With the proper prep, a few steady moves, and a little patience, you can get lashes that stay in place and look great from every angle. Whether you're heading out for a special event or want to add some drama to your everyday look, these steps will help you do it cleanly and confidently—no fuss, no fallouts.